Happy back-to-school day (if you have kids)! (My daughter isn’t actually back to school until Wednesday but most school boards are back today I think.) It’s always a bittersweet time – happy to be able to get back to work and the routine; but sad that there is an end to the sleeping in, biking, beach and lazy days of summer!
I do love September though and all of it’s possibilities!
If you have been following along, you may have seen a number of iterations of the living room half of my living/dining room. (I also have a family room which I have shown bits and pieces of.) I have never shown the dining room side before though.
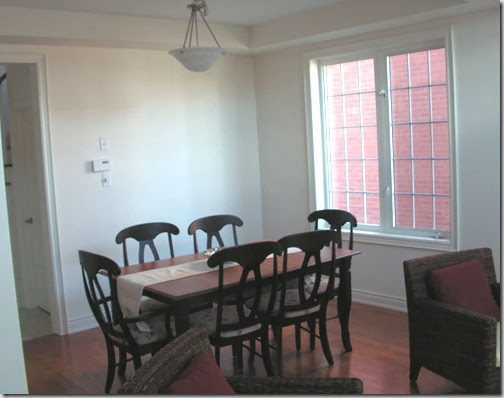
This is the very embarrassing BEFORE shot taken when we moved into the house 7 years ago. The dining set is Canadian made and was purchased about 10 years ago. Oh, and see those chairs in the foreground? I had them slip covered which you may have seen in the Style at Home feature.
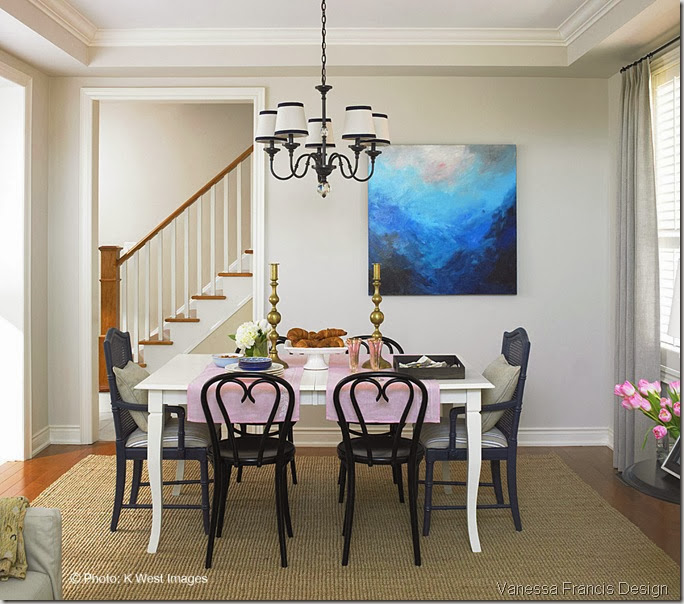
I know, right? But don’t worry, it only stayed that way for a few weeks! And this is how it looks now (this photo was taken in March of this year right after the Steven and Chris shoot.)
Photo credit: K West Images
(In case you are scrolling back and forth – yes it is the same space but my photographer photoshopped the thermostat etc. out. They don’t really add to the pretty pic and that’s why you will rarely see them in magazines!)
Eight Ways to Update a Dining Room:
1) Paint furniture: I had the table professionally sprayed an off-white shortly after the Before pic was taken. I still loved the clean lines and curvy legs but wasn’t fond of the wood tone. Paint it Like New is a great resource.
2) Break up the set: I found the two cane-back end chairs in a vintage store, had them sprayed a dark blue and reupholstered in a stripe fabric.
I have always loved bentwood chairs especially these ones with the “heart” back. They are made in the same factory in Europe where the original Thonet chairs were made in the mid 1800’s. (Remember, SJP had one in her gorgeous Hampton beach house.)
If you live locally and are interested in purchasing the chairs in the Before pic, let me know. A coat of paint and new fabric on the seats and you will have a well-made set of chairs!
3) Update the lighting: I had Lia change the fabric on the shades to an ivory linen and add navy ribbon to them. Getting a new chandelier wasn’t in the budget and I wasn’t entirely tired of this Restoration Hardware one (purchased 7 yrs ago.)
4) Hang bold original art: This is a custom piece by Andrada. Her original paintings are extremely affordable and add so much life to a space.
(The space is really tight so I have been on the hunt to find a very slim console table to place under the painting. Actually, what I really want for that space is a piano. I used to play and my daughter wants to learn. It’s the only inside wall where it could go. I went piano shopping the other day and I may have to put that on hold for awhile!)
5) Add Drapery panels: The custom linen/blend drapes layered over the shutters finish off the room.
6) Find one-of-a-kind pieces: I found the oversized brass candlesticks from the 1930’s (so I was told) at the Aberfoyle Antique market. Adding a few accessories with patina adds charm and character.
7) Paint the walls: I recently changed my walls to this light grey colour called Fan Light Grey from Para. It instantly freshens up the room.
8) Add texture: I don’t usually advise clients to place an area rug under a dining table (because of the crumbs/spills) but in my case I wanted to minimize the orange tone of the hardwood floors. Plus, the dining room rarely gets used as we have a dining table in our kitchen! This jute rug from West Elm is inexpensive and adds a ton of texture.
What are your tips for updating a dining room?
Have a wonderful week!


